When I first began to garden and was a total newbie, I wish I’d known about this!
After being offered an allotment plot, I started watching as many YouTube videos as possible to help me understand how to get the best yield from my crops, but mostly how to keep them alive! This is where I found this amazing plant-watering hack.
If you’re interested in how I changed my allotment plot from a rubbish dump to a healthy vegetable patch, you can read this post: My Allotment Transformation.
One thing plants need more than anything is water, but unfortunately, it isn’t as simple as just pouring it over your plants every few days and leaving them to their own devices.
During the summer months, the temperature can make it difficult to water your plants.
If you’re watering on the surface, the moisture can evaporate away before it can filter down to the roots, where it is needed.
I found this especially so when growing in multipurpose compost.
If the surface is completely dry, sometimes it forms a seal and doesn’t allow water through it.
This can be difficult to spot because the water seems to seep into the soil, but actually, most of it is just evaporating. Only a small amount may be reaching the lower levels of the soil.
That isn’t enough for your plant even if it was to reach the roots. This is a bigger problem if you’re growing in containers because they dry out faster and don’t have access to ground water.
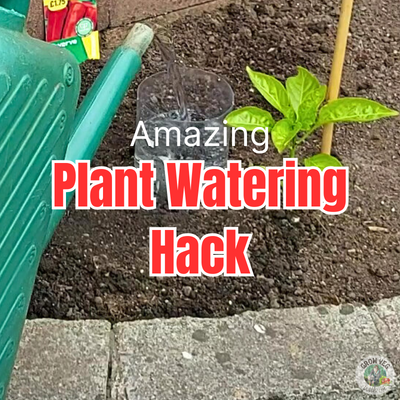
However, this amazing plant watering hack using a plastic bottle eliminates this problem:
So how do you use this method?
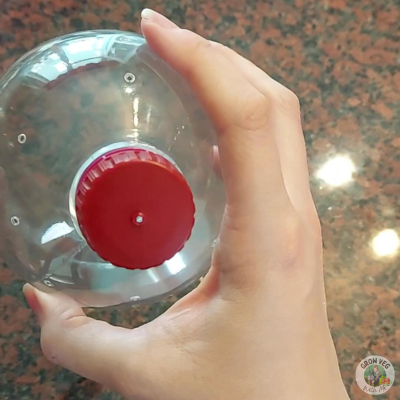
1. Choose a Bottle and Make Holes in it:
It’s easy and best of all, free! You can use any old plastic bottle or milk carton (so you’re also helping to reduce waste and recycle). I’ve found two litre drinks bottles to work best for me.
I have a YouTube video showing how I made them here if you would rather watch that, but I will explain how I did it.
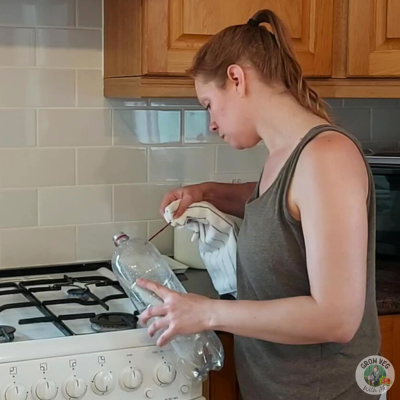
First, you will need something to pierce holes in your plastic bottle. I like to heat up a thick metal needle or bbq skewer on the stove and use it to make my holes.
You can also use a drill, or another sharp instrument, but whatever you choose, be careful!
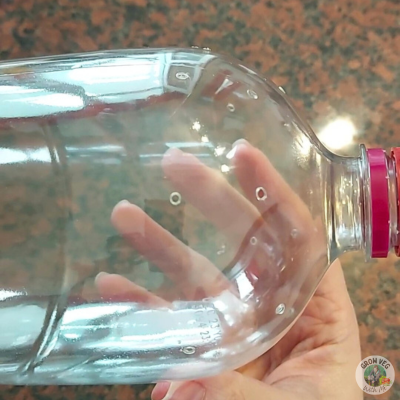
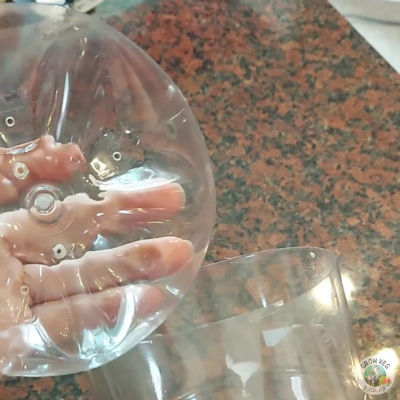
I like to make two rows of holes, around an inch apart. The amount and size of the holes allow you to control the amount of water being released into the soil. The more holes and the larger they are, the faster the water will flow out of it.
I would recommend a slow flow of water to avoid the soil flooding. This way, the soil’s moisture gradually increases, making the plants’ roots reach for it. This means they are more likely to grow longer, strengthening the plant.
Another trick you can use is to pierce only one hole in the lid of the bottle. The water should drip feed into the soil and you can leave it to water your plants while you are away for a few days!
After piercing holes in the bottle’s neck, I put some in the bottom before cutting it off.
The final hole is placed in the lid, which should be firmly screwed on.
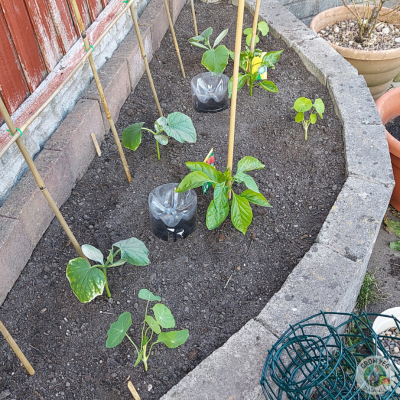
2. Make Enough Bottles for Your Space:
If you’re using containers, one bottle should be enough for each. But if you’re growing in the ground or a raised bed, it is a good idea to have more, depending on the amount of plants (see photos for my spacing).
The water can only spread so far and one bottle wouldn’t be enough for an entire raised bed. I usually space my bottles so that each plant has one within a few inches of it.
The further they are away from the bottle, the less chance they have of benefiting from it.
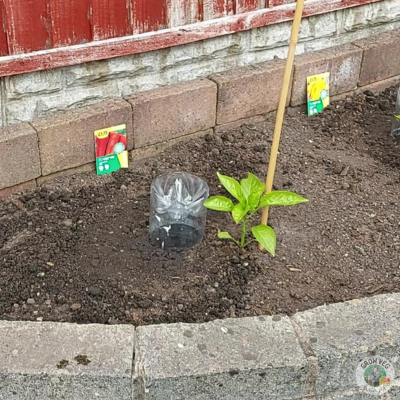
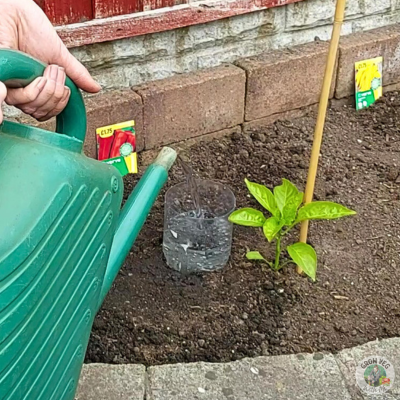
3. Dig in Your Bottles:
For the bottle to deliver water to the roots of the plant, it needs to be dug into the soil at least half way (depending on the length of the bottle).
This is best done before you plant out, so that you won’t be disturbing any roots when you dig the hole for the bottle. You can also do it as you are planting out because your plant’s roots will still be small and there is less chance of damaging them.
Using this method doesn’t mean you don’t need to water your new plants in (that’s the first time you water your plants after putting them in the soil).
Your new plants or seedlings won’t have spread their roots into the soil yet, so it’s good practice to give them some water immediately after planting.
You should also still water seeds when initially sowing them, and keep doing this regularly until the seedlings have established and have rooted down a little.
The bottle is dug in upside down so that the lid is at the deepest point. Then it should be firmed in with the soil packed tightly against it so that it doesn’t move.
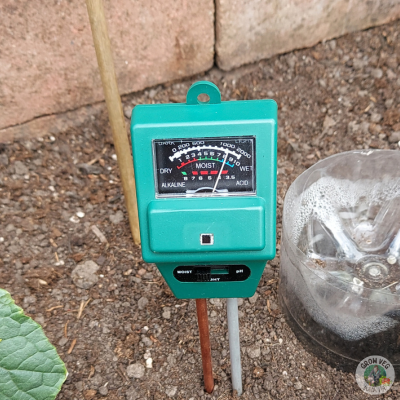
4. Check the Moisture Level:
You will need to check the moisture level of the soil before watering because once your bottles are in place, you won’t need to water as often as you would on the surface. This is because there will be little to no evaporation using this method.
I would highly recommend the Moisture MeterI use, you can buy it here. You don’t need a fancy electronic one, mine does the job well and doesn’t cost much.
Moisture meters are not essential – you can push your finger into the soil instead, but I find it tricky to feel all the way to the roots this way.
From the photo, you can see that the soil looks dry, but below the surface it is actually quite wet and doesn’t need watering yet.
5. Start Watering Directly at the Roots:
Remove the bottom of the bottle (which is now the top) to fill with water (I fill around three quarters of the way). It should drain out between 10 and 30 seconds (if you have the same amount and size of holes I have in my bottles).
Replacing the bottom upside down to form a lid ensures that debris and insects can’t get inside and clog up your watering device.
It also stops bees from drowning in the water if it is draining slowly. Because you placed holes in this part, rain water can fall into the bottle as well as the water you put in there yourself.
Keep checking your moisture levels before you add water because this will be different depending on the weather and temperature.
So that’s how you can water directly to the roots of your plants and even have a drip feed for them if you are away for a while.
Let me know if you’ve tried this method and how it’s working for you – I would love to know!
I hope you found this post helpful – if you did please leave me a comment below and visit my instagram account and Youtube channel where you can see more of what I’ve been up to.
This post may contain affiliate links. If you click one and make a purchase, I may receive a small commission. This will be at no additional cost to you. You can read our disclosure policy here.